Connecting a Windows Server 2016 host to StorPool iSCSI
When a StorPool volume needs to be accessed by hosts which cannot run the StorPool native client service (e.g. Windows Server), it may be accessed using the iSCSI protocol.
Introduction
For general information about using the iSCSI remote block device access protocol with StorPool, see iSCSI overview.
Reliability settings
The aim of these settings is twofold:
The first is in case of network or related problems, the initiators to be able to wait for the issues to be resolved, and then resume regular operations instead of returning errors to the end-users. This way, any intermittent problem will not have a lasting effect, as what has been observed otherwise is that after a failure in connectivity longer than the default timeouts, the initiators or the VMs running on them, need to be restarted to resume normal operations.
The second is in case of partial or brief failures, the initiators to be able to fail-over as quickly as possible to minimize any stalls of operations that may be felt by the end-users.
You should edit the following values (in hexadecimal, and decimal in brackets)
found in HKEY_LOCAL_MACHINE\SYSTEM\CurrentControlSet\Control\Class\{4D36E97B-E325-11CE-BFC1-08002BE10318}\<Microsoft iSCSI Initiator>\Parameters:
MaxRequestHoldTimetoffffffff(4294967295)LinkDownTimeto00000005(5)SrbTimeoutDeltato00000005(5)PortalRetryCountto0000012c(300)EnableNOPOutto00000001(1)
You should also edit the following values:
TimeOutValuefound inHKEY_LOCAL_MACHINE\SYSTEM\CurrentControlSet\Services\Diskto00015180(86400)PDORemovePeriodfound inHKEY_LOCAL_MACHINE\SYSTEM\CurrentControlSet\Services\mpio\Parametersto00015180(86400)
Glossary
MaxRequestHoldTime: The maximum time (in seconds) for which requests will be queued if connection to the target is lost and the connection is being retried. After this hold period, requests will be failed and the block device (disk) will be removed from the system. To prevent this from happening, setting the value toffffffff(4294967295) will set the hold time to infinite.LinkDownTime: Determines how long requests will be held in the device queue and retried if the connection to the target is lost. Contrary toMaxRequestHoldTime, you should set the value to00000005(5) as it is important to keep the “freeze” time of operations to a minimum in case of a link failure and a subsequent failover. If MPIO is installed, this value is used. If MPIO is not installed, MaxRequestHoldTime is used instead.SrbTimeoutDelta: This value is used to increment the timeout set by class drivers. The value can be set as low as 5 seconds, if it is lower than that, the initiator will effectively use 15 seconds instead. Setting the value to00000005(5) lowers the maximum “freeze” time of operations during a link failure with an additional 10 seconds.PortalRetryCount: This value is used to determine how many times a connect request to a target portal should be retried if the portal is down. We recommend setting the value to0000012c(300).EnableNOPOut: Setting the value to00000001(1) enables the initiator to send heartbeat packets periodically, checking connectivity to the target and forcing reconnect when interruptions occur.TimeOutValue: The maximum waiting time (in seconds) for delayed disk operations before Windows produces errors. We recommend setting the value to00015180(86400).PDORemovePeriod: Specifies a physical device object (PDO) removal period, in seconds. This period is the length of time the server waits after all paths to a PDO have failed before it removes the PDO. We recommend setting the value to00015180(86400).
Important
Restart Windows to ensure that the changes made to the registry have been applied.
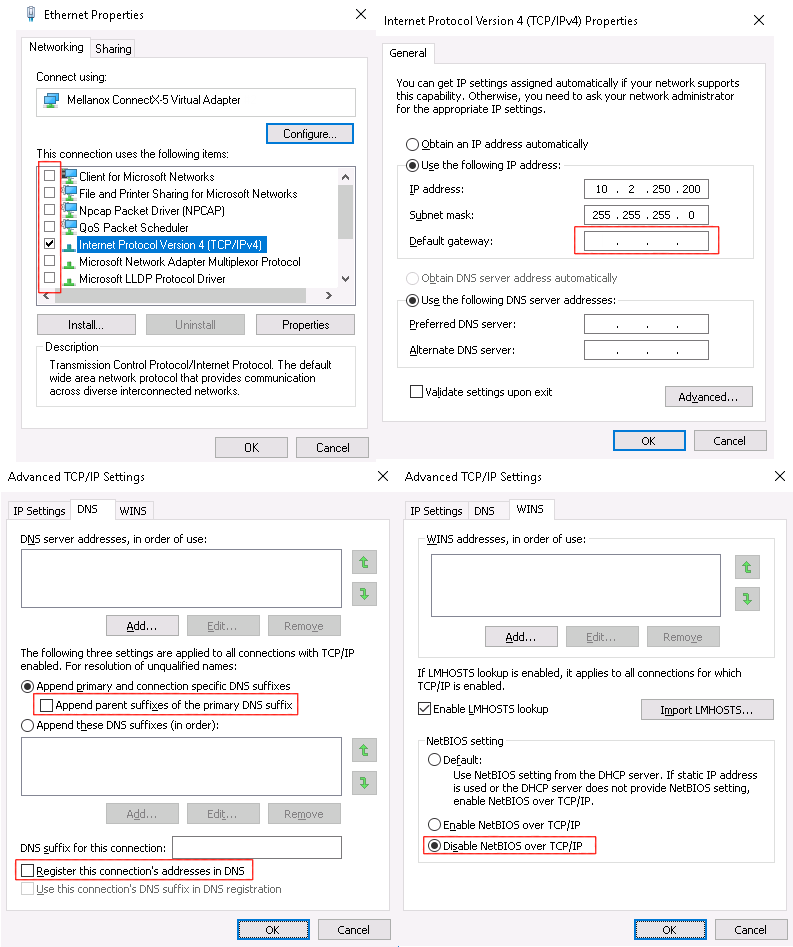
Basic network settings
All network adapters to be used for iSCSI traffic should have only IP addresses and subnet masks set up - all other options/settings should be blank:
Basic connection to targets
Once the StorPool iSCSI target volume has been exported, and the network adapters on the Windows host are configured, it’s time to connect the initiator.
In Server Manager, go to , enter the floating IP address of StorPool’s iSCSI service and hit “Quick Connect …”:
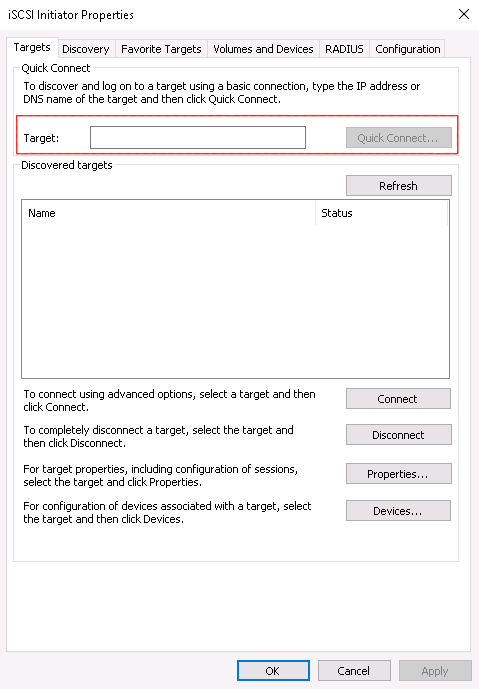
An additional menu should pop-up with a discovered target name and a progress report message reading “Login Succeeded”.
Then, go to the “Volumes and Devices” tab and hit the “Auto Configure” button:
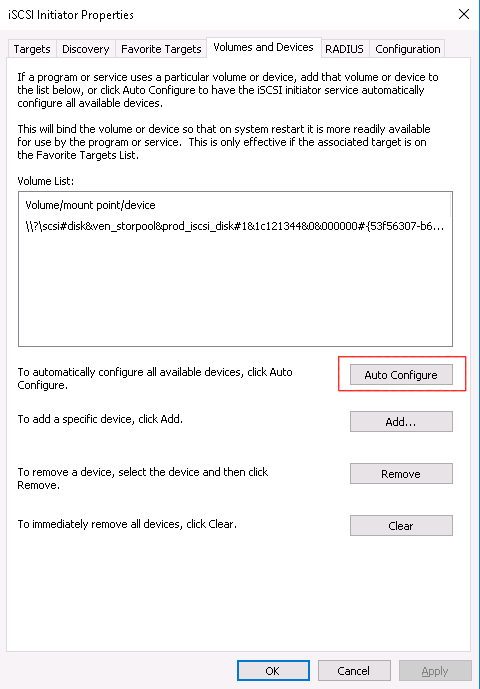
The exported volume(s) should appear in the “Volume List” as shown above.
After that, go to :
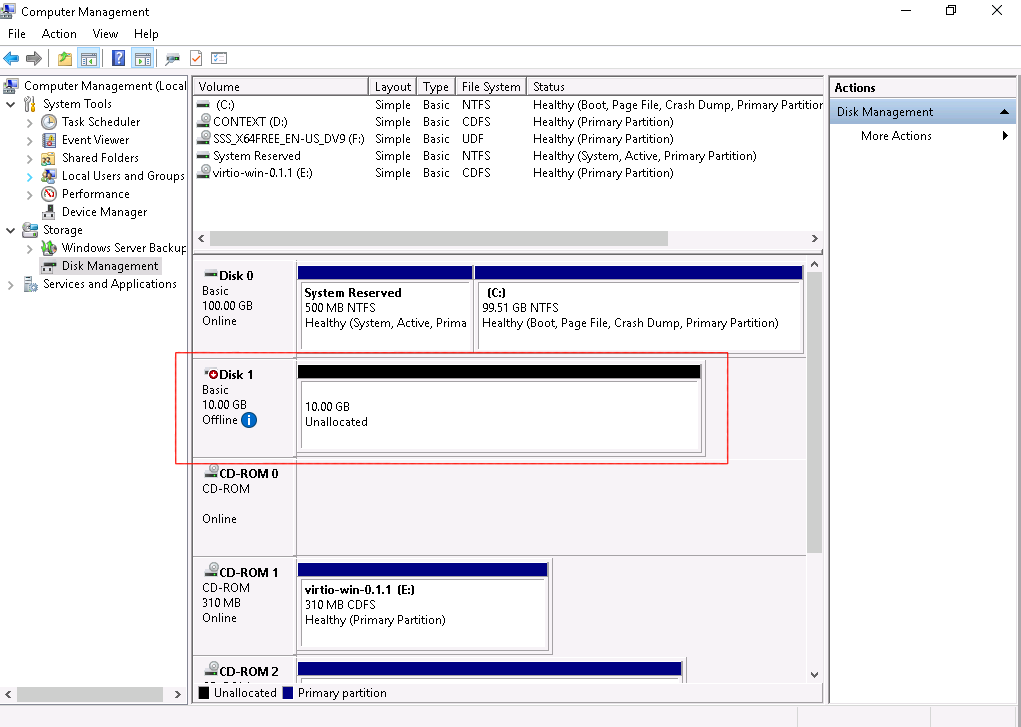
The exported volume(s) should appear in the list as unallocated disk(s).
Note: In order to use the disks, they need to be brought online and initialized.
Configuring Multipath I/O (MPIO)
Prerequisites for MPIO
An additional network interface for iSCSI should be reserved for MPIO
A second floating IP address should be defined for the portal group
An additional portal should be created with an IP address belonging to the same network as the initiator on the Windows host
Installation and connection to targets
In Windows Server 2016, Multipath I/O functionality need to be installed from the “Add Roles and Features Wizard” after installation.
To install the MPIO feature, go to and select Multipath I/O, then hit “Next” and “Install”.
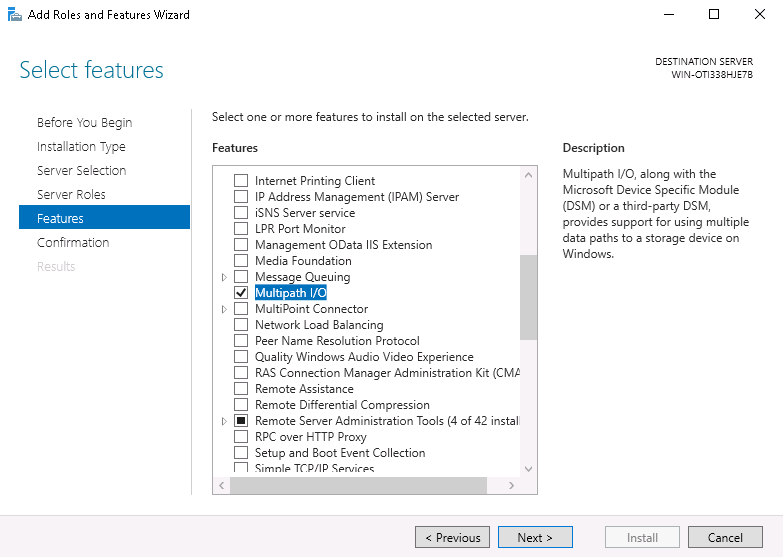
After the installation is complete, a server restart is needed.
MPIO needs to have iSCSI support enabled; go to :
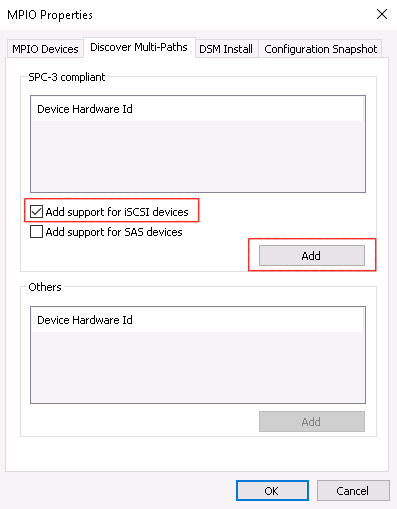
Select “Add support for iSCSI devices”, then click “add”. A reboot prompt will appear asking to reboot once more, and it should
be done in order to continue with the next steps.
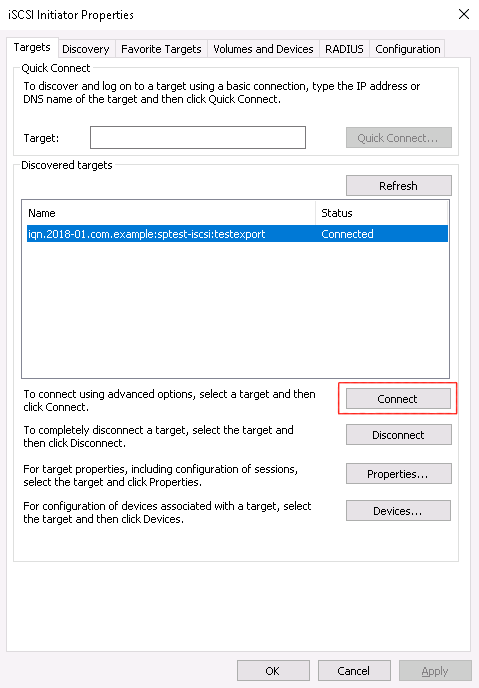
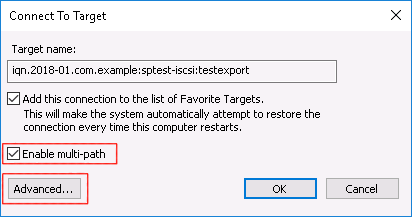
Once the reboot is finished, go back to the “iSCSI Initiator”, select a target and click “Connect”:
In the pop-up menu, click on “Enable multi-path” and then hit “Advanced…”:
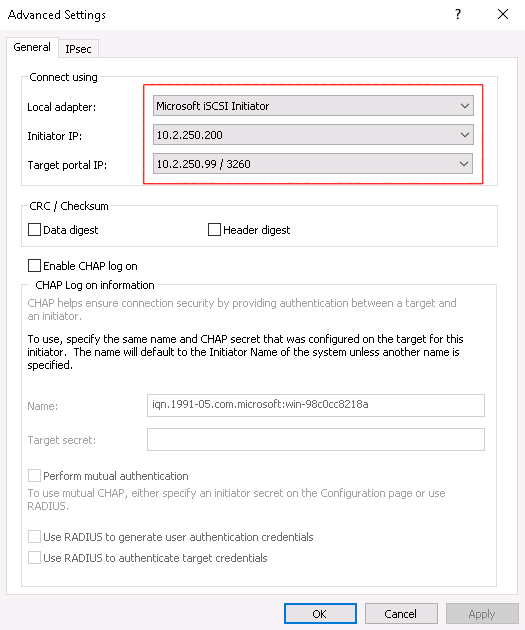
In the “Advanced Settings” window, select the Local adapter and the address belonging to the iSCSI interface, then select the floating IP address of StorPool’s iSCSI service:
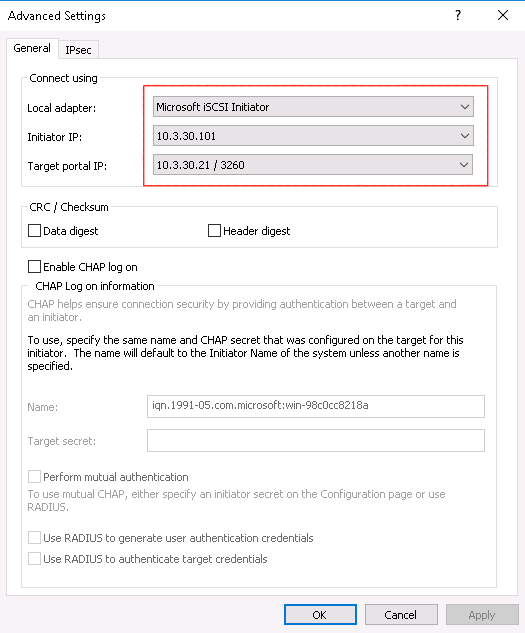
Then, repeat the previous two steps, then selecting the second configured floating IP address of StorPool’s iSCSI service:
Note: More than two simultaneous connections can be configured by repeating the process described above.
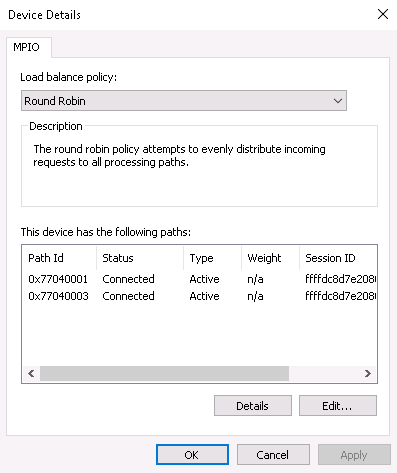
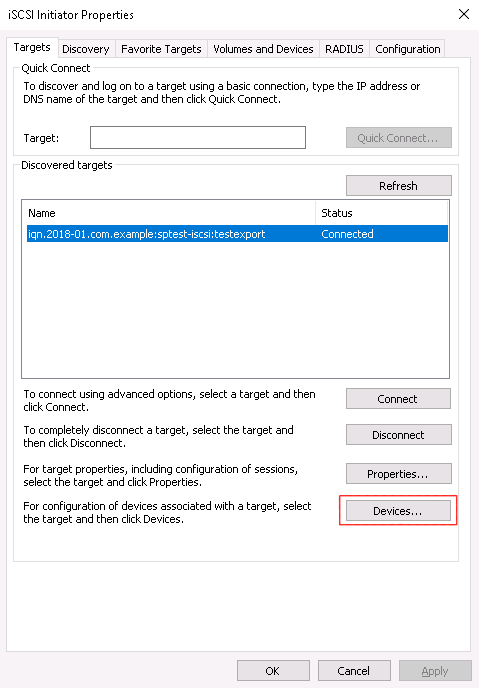
To check if the Multipath I/O is working, select the connected target and click on “Devices…”:
Select a disk and click on “MPIO…”:
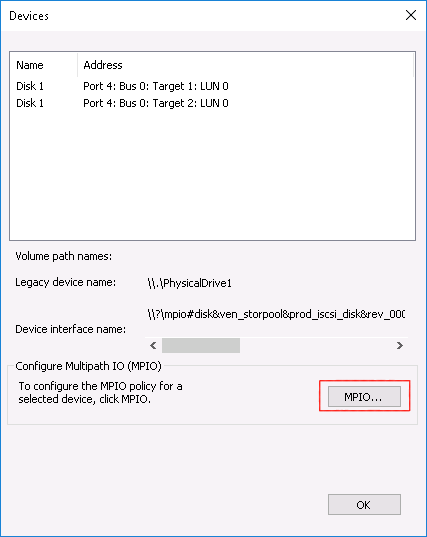
More than one path should be visible in the list of paths: